Come utilizzare la profondità di campo a tuo vantaggio
La profondità di campo è importante per acquisire un'immagine nitida dell'oggetto che si sta ispezionando. Con il corretto utilizzo della profondità di campo, è possibile garantire che l'oggetto ispezionato sia a fuoco, mentre lo sfondo e il primo piano non lo siano. In questo modo, è più facile per il vostro software di visione riconoscere l'oggetto.
La profondità di campo è un fattore importante che puoi utilizzare a tuo vantaggio. Questo articolo spiegherà che cos'è la profondità di campo e come utilizzarla.
Sommario
Che cos'è la profondità di campo?
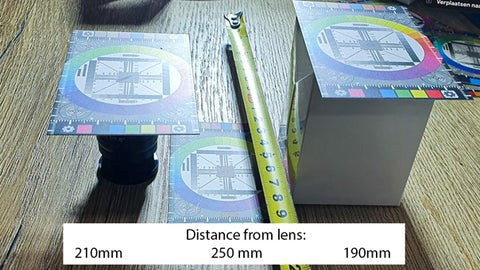
Tecnicamente, la profondità di campo è la distanza tra l'oggetto più vicino e quello più lontano dell'immagine che risulta a fuoco durante l'acquisizione. Nell'immagine sottostante, la distanza di lavoro è di 250 mm. L'oggetto più vicino all'obiettivo si trova a 190 mm di distanza. L'oggetto più lontano si trova a 250 mm di distanza e, tra questi, vi è un oggetto a 210 mm dall'obiettivo.
Se la configurazione della Telecamera ha una profondità di campo ridotta, ad esempio 30 mm, sarebbe possibile mettere a fuoco l'oggetto più vicino e il secondo, ma la carta più lontana risulterebbe fuori fuoco. Controllando la profondità di campo, si potrebbero mettere a fuoco tutti e tre gli oggetti oppure, ad esempio, sfocare specificamente due delle tre carte.
Controlla la profondità di campo con il diaframma
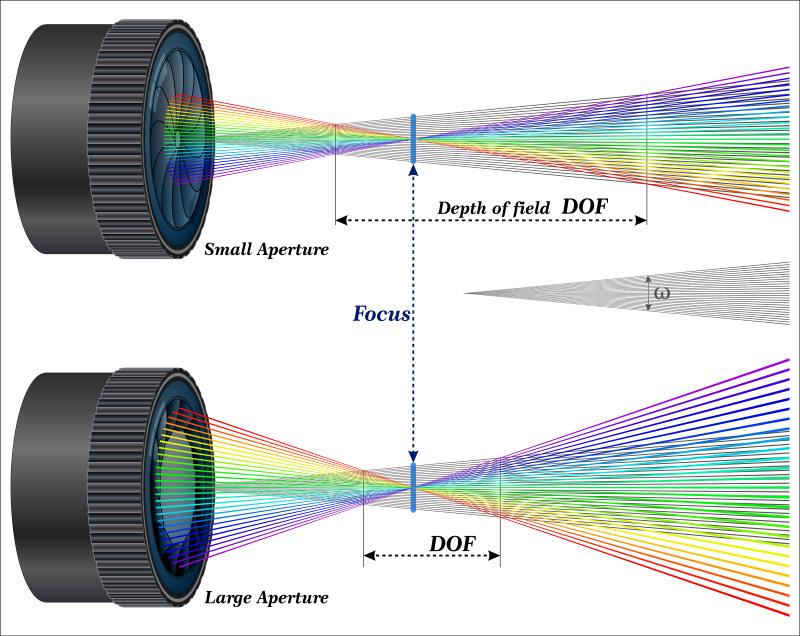
L'apertura del diaframma ha una grande influenza su quanto sia ampia la profondità di campo. Se il diaframma è completamente aperto, ad esempio F1.4 o F2.0, la profondità di campo è relativamente ridotta. In alcuni casi (F1.4), la profondità di campo può essere di pochi millimetri. Tutto ciò che si trova al di fuori di quest'area risulterà fuori fuoco. Se il diaframma è quasi chiuso, ad esempio F16, la profondità di campo è maggiore e la maggior parte dell'immagine sarà nitida. Si prega di notare che chiudendo il diaframma, l'immagine diventerà più scura. Per compensare ciò, è necessario aumentare il tempo di esposizione, il guadagno o la luce.
Esempio F1.4
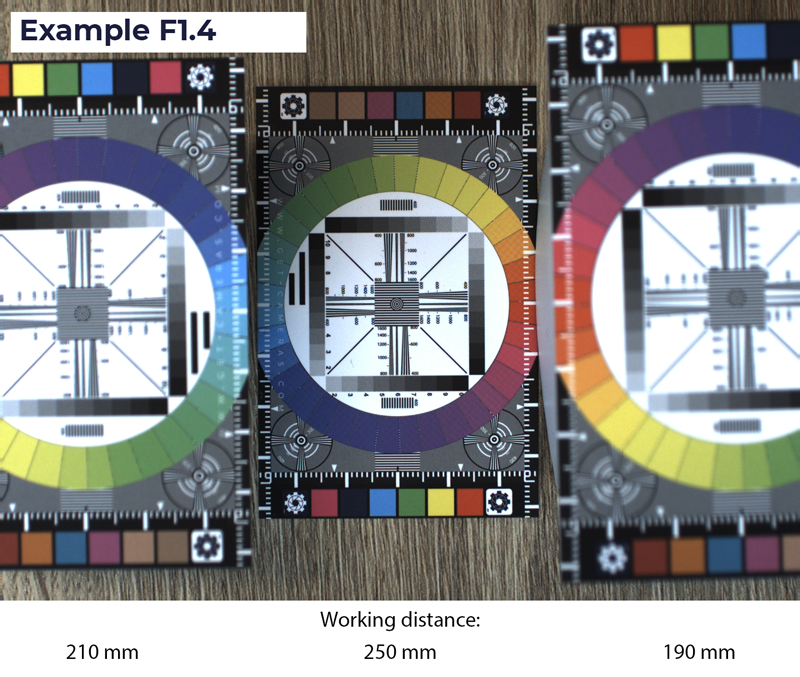
Come menzionato in precedenza, un'apertura ampia (numero F basso) comporta una profondità di campo ridotta. Una profondità di campo ridotta è necessaria se si hanno oggetti in primo piano o sullo sfondo che si desidera sfocare.
Pro F1.4
- Molto sensibile alla luce (tempi di esposizione brevi e poco o nessun guadagno digitale richiesto)
- Sfocatura dell'oggetto in primo piano o sullo sfondo (più facile per il software di elaborazione delle immagini)
Contro F1.4 - Profondità di campo ridotta (informazioni importanti potrebbero non essere nitide) oppure IMX304 ha 4096x3000 pixel.
L'immagine a destra illustra che la scheda a 250 mm è nitida, quella a 210 mm non è già perfettamente a fuoco e i dettagli potrebbero non essere chiari per il software di elaborazione delle immagini. La scheda a 190 mm è ancora più sfocata e inutilizzabile.
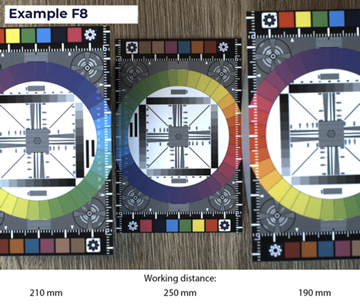
Esempio F8
Come già accennato, un'apertura ridotta (numero F elevato) comporta una maggiore profondità di campo. Un'ampia profondità di campo è necessaria se l'oggetto presenta altezze diverse che devono essere ispezionate. Inoltre, è richiesta anche se si hanno più oggetti che possono trovarsi più vicini o più lontani dalla Telecamera. Una maggiore profondità di campo consentirà di mettere a fuoco entrambi gli oggetti.
Pro F8
- Ampia profondità di campo (un'area più estesa sarà nitida)
Contro F8 - Meno sensibile alla luce (richiede un tempo di esposizione più lungo o un maggiore guadagno digitale. Potrebbe essere necessario aggiungere una fonte di luce supplementare)
- Più difficile sfocare oggetti in primo piano rispetto allo sfondo
Come si può vedere, le schede a 250 mm e 210 mm sono sufficientemente nitide. La scheda a 190 mm è ancora sfocata, ma meno rispetto all'esempio con F1.4. La perdita di luce è stata compensata con un tempo di esposizione più lungo e un guadagno digitale. Un tempo di esposizione più lungo può causare sfocatura da movimento per oggetti in movimento. Un elevato livello di guadagno digitale comporterà una grana visibile.
Suggerimenti per lavorare con la profondità di campo
- La profondità di campo è troppo ridotta, ma chiudere l'apertura non è un'opzione? Prova ad aumentare la distanza tra l'oggetto e la Telecamera. In questo caso, i pixel per millimetro diminuiranno. Se questo diventa problematico, prova un obiettivo con una lunghezza focale maggiore.
- Chiudere ulteriormente l'apertura per ottenere una maggiore profondità di campo comporterà immagini più scure. Compensa questa perdita aumentando il tempo di esposizione, aggiungendo guadagno digitale o una fonte di luce supplementare.
- Se il tuo oggetto non è completamente a fuoco, prova a chiudere leggermente l'apertura. Un numero F più alto comporterà una maggiore profondità di campo.
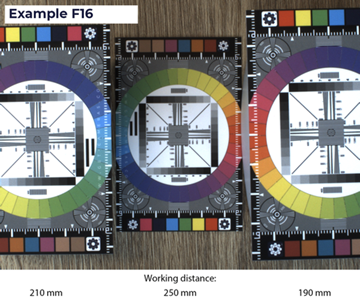
- Se possibile, cerca di mantenere l'apertura inferiore a F8. Se chiudi ulteriormente l'apertura, perderai anche qualità d'immagine a causa del potere risolutivo ottico dell'obiettivo (vedi immagine sotto)
Esempio F16
In questo esempio abbiamo utilizzato F16. Il diaframma era quasi completamente chiuso. Tutte le carte sono uniformemente nitide, ma la qualità complessiva dell'immagine non è così buona come si vorrebbe. Nota: tutte le immagini sono state compresse per il web.
